 |
| Make your own picture collage |
torsdag 28. april 2011
Inspiration!
Spring collection from New Look. Fits perfectly in to your 50´s wardrobe...
New lamp for the babyroom
As I said I was really satisfied with the lamp that we had in our babyroom. I looked for a long time after that special lamp, but never found anything that suited the style in the room, so I found out that if I wanted that special lamp I had to make it myself!I accidentely found this idea for the lamp in a norwegian magazine Kamille.
This is how you make the birdcage-lamp
You need:
- Poultrynet
- Copperthread
- An old lampshade where you remove the fabric and only use the shape.
- Copperspray
- 3 sticks
- Some black paint
- Decorating birds
- Glue pot
Sånn gjør du:
- Meschure to the right size with the poultrynet by taking it around the lampshade. Sew it together by using the copperthread.
- Spray with copperspray, while the copperspray dries you paint the three sticks in black or another colour that you would prefer.
- When it´s all dried you glue the decorating birds on to the sticks. These kind of birds you can get at Panduro.
- Attach the sticks across the cage and on to the poultrynet using the copperthread.And the lamp is ready to use!
Here is my lamp:

..but if you´re not handy enough to make it yourself, you can now buy it at ModCloth!

I think our little prince will LOVE this lamp! He´s obsessed with birds at the moment!
onsdag 27. april 2011
The Babyroom!
When our little prince arrived in 2009 we had to decorate the baby´s room! ANd I just want to share the process, because soon I think and hope that we have to redecorate the room next to it since our prince will sleep there if he becomes a big brother ;) (I just have to talk to my husband..hehe)
We live in a typical norwegian 70s house and it really hasn´t een done anything since it was built in 1979... : /
Well, well...
This is how it looked like:

and after a week with a lot of paint in the ceiling, new floor, new paint on the walls and furniture, it turned out this way:

The deer and butterflies on the wall I made myself out of stencils. The inspiration I got from Blafre design.
The rocking chair was a scoop at the Salvation Army shop (The chair had to be covered because it´s turqoise seat didn´t really match the rest o the room... : / )
Pillow and curtains, with blue polka-dots of course! Was bought at Kid interiør

The cute Rabbit lamp I bought online at Casa Casino. A little cheaper than in Norway... The frameshelf is bought at IKEA, and the frames as well. In the frames I´ve put pictures/cards from Blafre designs with a theme of animals in the woods. This is a theme that I´ve put in little details around the room like swallow hooks in white from Designtorget and a sleepy owl from Marks and Spencer that decorates one of the shelves abowe the nursing table.


BUT the lamp in the ceiling I´m not satisfied with so I invented a new lamp...but this I will blog about tomorrow! ;)
Have a super day!
We live in a typical norwegian 70s house and it really hasn´t een done anything since it was built in 1979... : /
Well, well...
This is how it looked like:
and after a week with a lot of paint in the ceiling, new floor, new paint on the walls and furniture, it turned out this way:
The deer and butterflies on the wall I made myself out of stencils. The inspiration I got from Blafre design.
The rocking chair was a scoop at the Salvation Army shop (The chair had to be covered because it´s turqoise seat didn´t really match the rest o the room... : / )
Pillow and curtains, with blue polka-dots of course! Was bought at Kid interiør
The cute Rabbit lamp I bought online at Casa Casino. A little cheaper than in Norway... The frameshelf is bought at IKEA, and the frames as well. In the frames I´ve put pictures/cards from Blafre designs with a theme of animals in the woods. This is a theme that I´ve put in little details around the room like swallow hooks in white from Designtorget and a sleepy owl from Marks and Spencer that decorates one of the shelves abowe the nursing table.
BUT the lamp in the ceiling I´m not satisfied with so I invented a new lamp...but this I will blog about tomorrow! ;)
Have a super day!
POLKA-DOTS!
yes, I HAVE to blog a little about all those fantastic polka dotted clothes you can find...My closet is already packed with it and when my son, that´s 1,5 year old see things with polka dots and says: "Mummy", then it´s time to back down on the polka-dots...But I can still look at all the dresses, tops, sweaters, bikinis, cups, lamps, tablewear etc. with polka-dots!

I have this dress and I LOVE it!!

Dresses from My Baby Jo and Pin Up Girl Clothing,suitcase from Helt i hundre, blanket from Princess.
torsdag 7. april 2011
50-tallet fra innerst til ytterst (Del 2: Kjoler
Nå skal jeg ta for meg kjoler, for ingenting er mer fantastisk enn å kunne ikle seg en 50-tallskjole som omfavner former og gir deg en feminin figur. Og det beste: man føler seg som festens midtpunkt ;) Og få har lik kjole (sett at du bestiller på nettet...)
Det er noen gyldne regler for å virkelig gjennomføre stilen. En A-formet kjole må være utsvingt fra midjen og lengden må nå ned til knærne eller litt lenger. Med en såkalt petticoat (underskjørt) under så kommer kjolen til sin rett.
Her er et knippe fra mine favoritt nettbutikker (Finnes mange sider som spesialiserer seg på retro tøy, men disse kjolene sitter perfekt! + at leverandør sender veldig kjapt :))
 Fra
Fra Fra Tara Starlet
Fra Dolly Dagger
Om ikke lommeboka strekker til, så kan man få stilen på budsjett!
På Topshop kan man få denne Audrey Hepburn inspirerte sommerkjolen:

Og på H&M kan man få denne:
 (litt dårlig bilde, men kjolen er veldig søt....hehe)
onsdag 6. april 2011
50´s- fra innerst til ytterst (Del 1)
Undertøy:
Det som kjennetegner undertøy fra 40- og 50-tallet er såkalte bulletbras (BHer som har spissede cuper)truser med høy midje, strømpeholdere og blonder.
Vil du ha noe ekstra spesielt anbefaler jeg å sjekke ut nettsiden Pandoras choice. De spesialiserer seg på burlesque undertøy, kostymer og tilbehør, noe bryllupsundertøy, og badetøy.

Eksempel fra Pandora`s choice
Disse er fra Kappahl sin 2011 kolleksjon, og trusene koster 99,- pr.stk. :)


Retro snitt og retro mønster fra H&M

Saty-up eller tynne strømpebukser med en synelig søm fra helen og opp er signatur strømpebukser fra denne epoken.

Billed eksempel fra BinBin
Det var 50-talls inspirert undertøy, altså del 1 av serien "50-tallet fra innerst til ytterst" Steg for steg om hvordan du gjennomfører stilen om enn bare for en kveld;) Del 2 : "Klær og sko", kommer senere!
fredag 1. april 2011
Hvordan lage LP invitasjoner
Jeg liker å gjøre ting selv. Ting skal ha sine særpreg og det skal ikke være ting og tang som alle andre har.
Bryllupsinvitasjonene våre til bryllupsfesten er intet unntak. Jeg har nå laget invitasjonene klare!
 Step 1: Klipp ut en stor sirkel i svart kartong (eller litt stivere ark) Jeg brukte en frokostasjett som mal og synes det ble passe størrelse.
 Step 2: Lag plate etiketten. Jeg brukte dataprogrammet Lightscribe for å få riktig størrelse i forhold til en vanlig CD-plate. Deretter printet jeg ut, gjorde noen finjusteringer i forhold til størrelsen på sirkelen, klipte ut og limte på. Inbydelsen har vi skrevet som om det er en ordentlig LP. Altså våre navn er liksom bandnavnet, så fant vi på en LP tittel og resten av informasjonen gjestene trenger er laget som en track-liste.
 Step 3: Cover til LP´en må en jo ha, så her brukte jeg bare Lightscribe sin cover-mal.
 Step 4: Jeg klipte to firkanter (her kan man sikkert finne på andre enklere løsninger også...)Limte de sammen i kantene. OBS: Ene siden må ikke limes for her skal LP-platen inn!
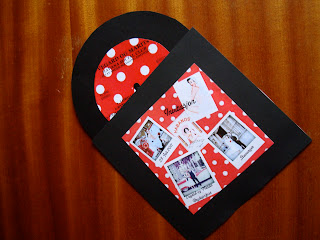 Step 5: Det ferdige resultatet!
Bryllupsinvitasjonene våre til bryllupsfesten er intet unntak. Jeg har nå laget invitasjonene klare!


Abonner på:
Kommentarer (Atom)